In August 2024, Canon released the much-anticipated Canon EOS R5 Mark II. While the original Canon R5 was already regarded as one of the best wildlife cameras of the century, the arrival of the R5 Mark II brought with it several noticeable improvements that have quickly made it a true game changer for many photographers, particularly those working in wildlife and macro photography.
The Canon R5 Mark II has given us as photographers the confidence to radically rethink how we approach our subjects. The boundaries are now determined by our own imagination and creativity rather than by the equipment. In the field, there is very little the Canon R5 Mark II cannot confidently take on.
I will not go into the technical details of all of the below, you can find this out on Canon’s website: Canon R5 MKII – Canon New Zealand
Some of the New Features of the Canon EOS R5 Mark II
-
New 45MP stacked back-illuminated CMOS sensor
-
Dual processor system
-
Pre-capture mode
-
30 frames per second burst shooting
-
Focus bracketing with flash compatibility – a huge win for macro photography! FINALLY !!!
-
Reduced rolling shutter distortion
-
Improved Eye Detection and Eye Control Auto Focus
With Canon R5 Mark II’s new sensor and improved autofocus, the difference is obvious from the moment you start taking photos. The camera feels alive, faster, brighter, and more responsive. The larger eyecup around the viewfinder really helps pull you into the scene, making you feel fully immersed in what you’re photographing.
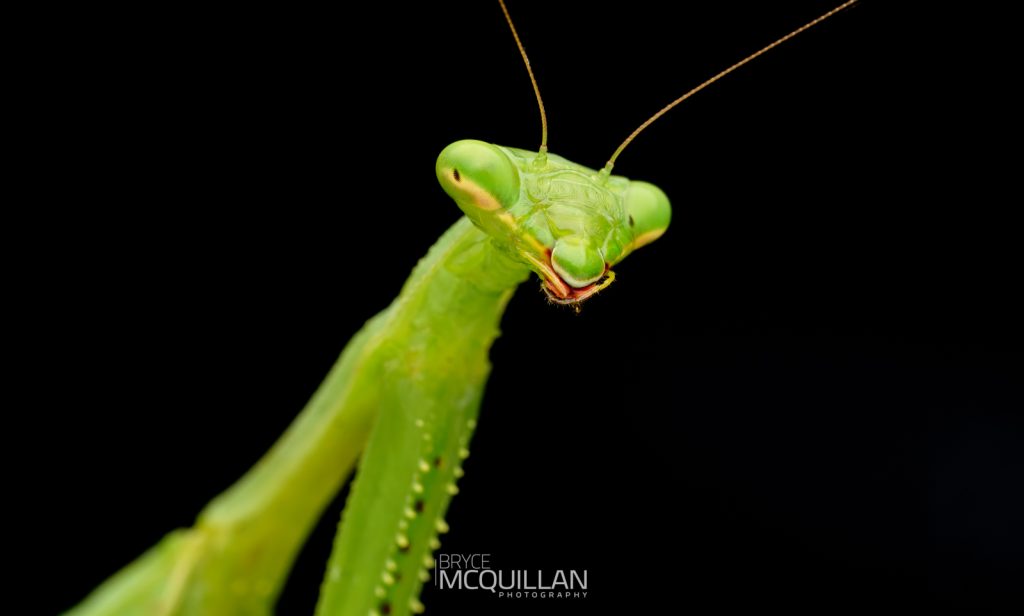
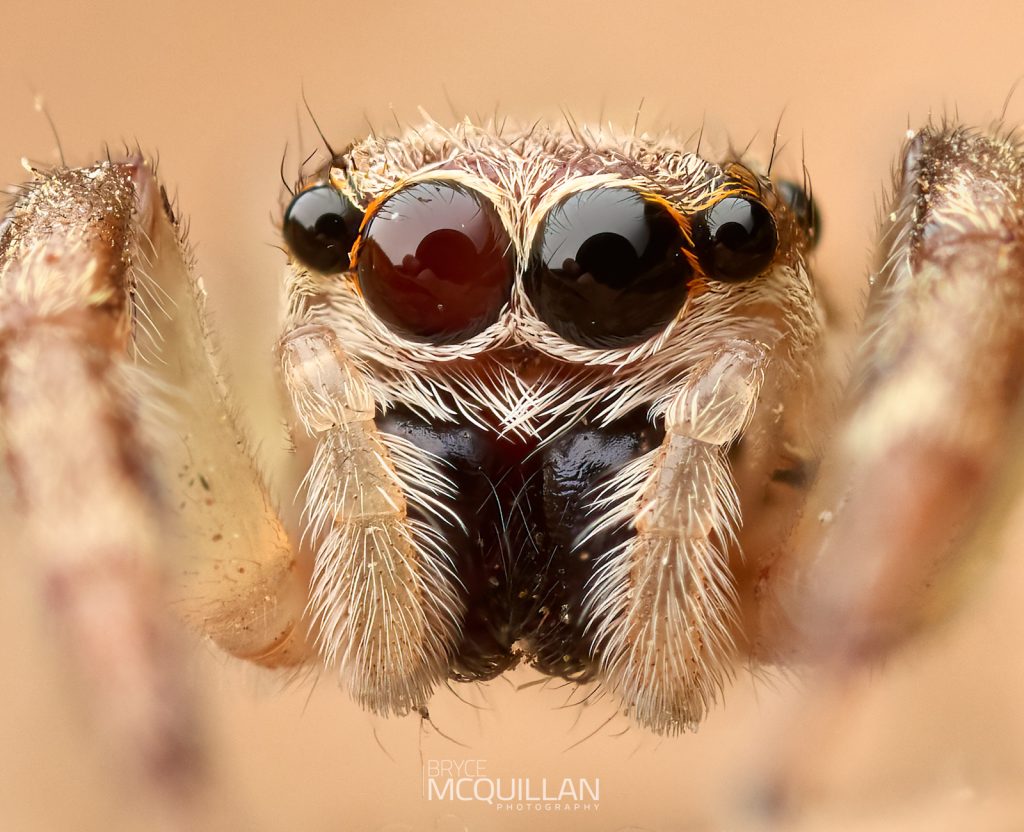
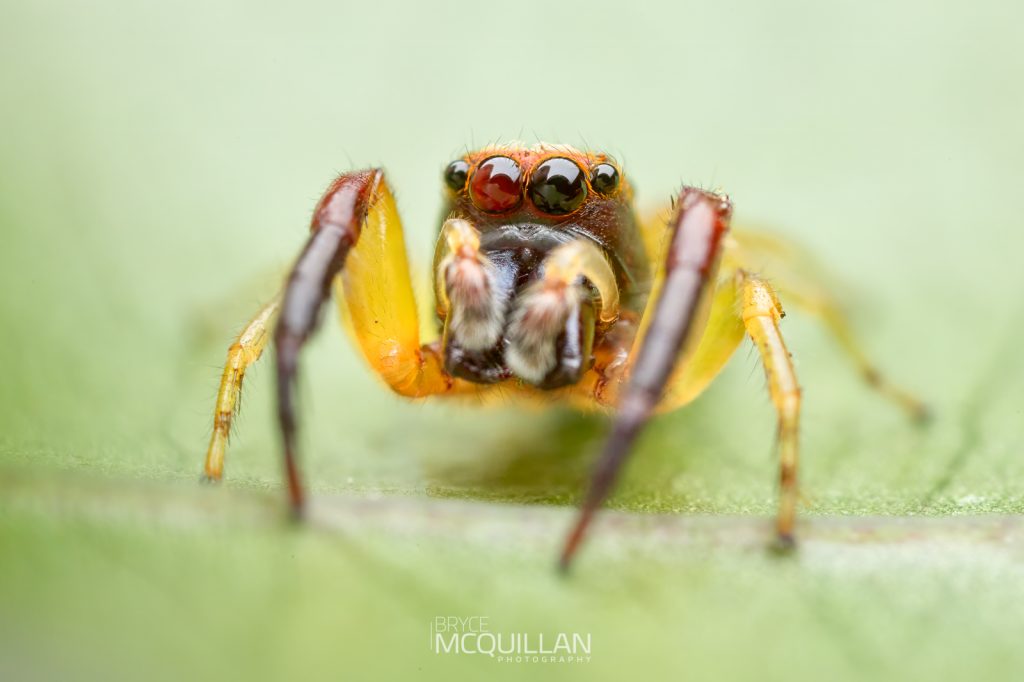
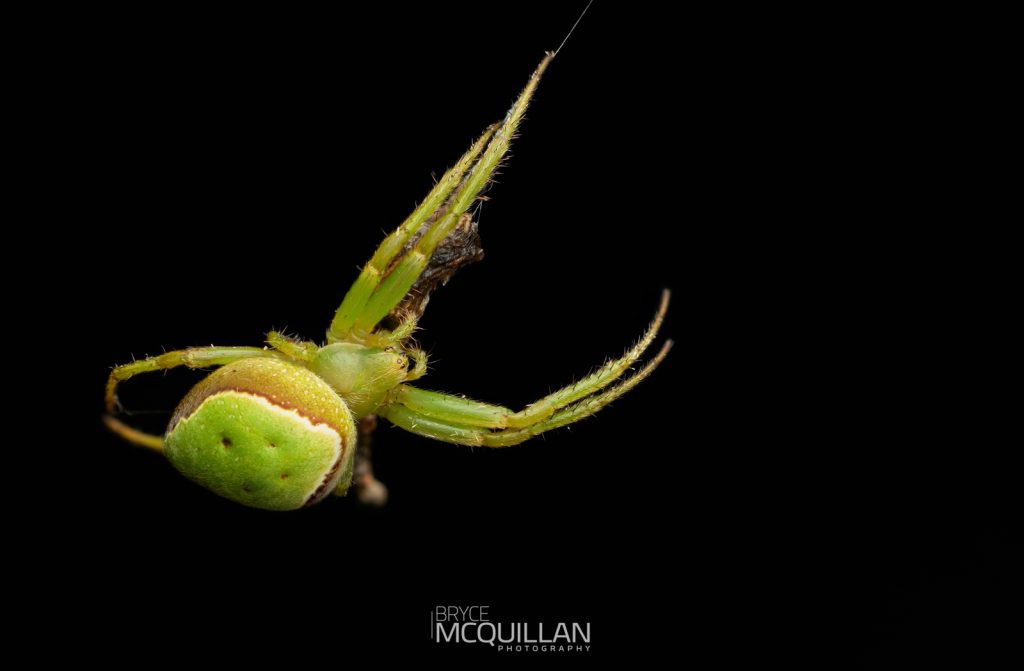
The autofocus on the Canon R5 MKII is truly exceptional. It locks onto the subject with impressive speed and accuracy, whether that be tracking a bird in flight, or identifying a person within a busy crowd using registered face tracking. What really stood out to me was observing the auto focus lock onto the eyes of this small female jumping spider (Trite sp.) with a body length of barely 6 millimetres. What makes this even more impressive is that the spider and the leaf it was sitting on were extremely similar in colouration, something that would typically confuse most autofocus systems. The fact that this camera was able to detect and lock onto the eyes so reliably is simply outstanding. For me personally, that really shows how far the autofocus has come from the original Canon R5, which already had an outstanding autofocus.
The Canon R5 Mark II gives you the freedom to stop second-guessing whether your subject will be in focus, allowing you to concentrate more on the subject.
This camera has fundamentally expanded my thinking of what is achievable in photography, particularly in macro photography of invertebrate species. Historically, certain images I had envisioned were simply not possible. In the past, there were shots that I would not have attempted due to technical challenges or limitations of the equipment. The Canon EOS R5 Mark II has transformed that reality, empowering me to rethink and to explore innovative techniques and creative approaches that previously seemed out of reach.
It’s not just a step up in equipment; it enables a shift in how you approach your photography. It brings a fresh sense of excitement and creativity back into what you want to photograph. Something that I haven’t felt for a while; my wife mentioned that she hasn’t seen me excited and smiling about a camera and photography like that for a while.
FOCUS BRACKETING WITH FLASH – FINALLY!!!
One of the most significant features for me personally, and one I have been waiting for since owning the original Canon R (Canon’s first true mirrorless camera) is the ability to perform focus bracketing with flash. At last, it’s here and available in a prosumer body. While focus bracketing with flash is not a completely new feature introduced with the Canon EOS R5 Mark II, having previously been available on the Canon EOS R3 and now also featured in the new Canon EOS R1 (which came out at the same time as Canon R5 MKII), the introduction of focus bracketing with flash has significantly expanded the creative and technical possibilities within macro photography. Previously, achieving consistent focus stacking required manual adjustment of the focus ring on the lens or physically shifting the camera or lens closer to, or further away from the subject. This technique, while capable of producing good results, was prone to inconsistencies. This manual approach often led to misaligned stacks and areas of missed focus, due to even the slightest of movement between frames. It was also much harder and required a steady hand.
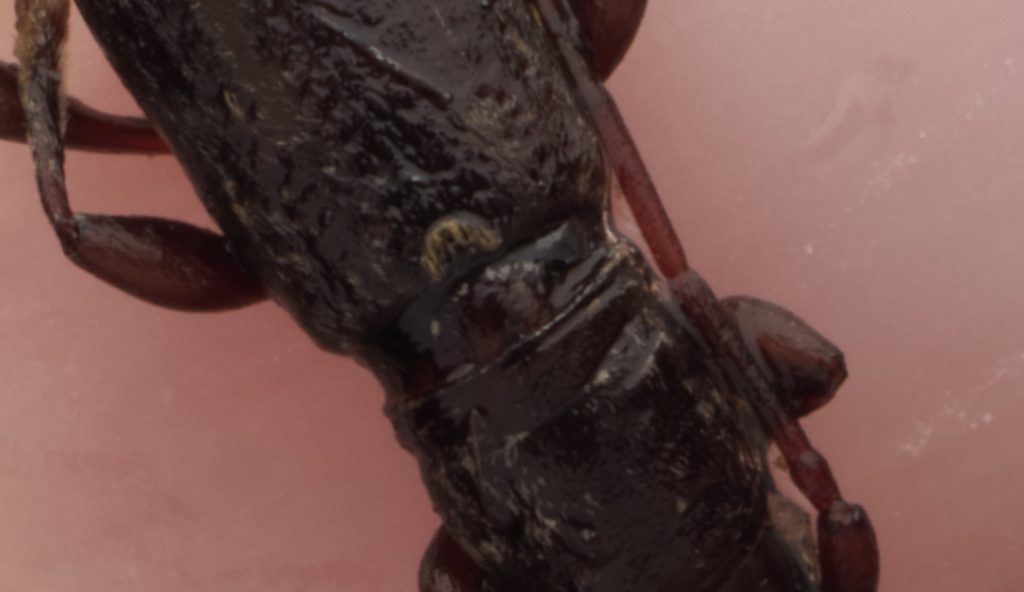
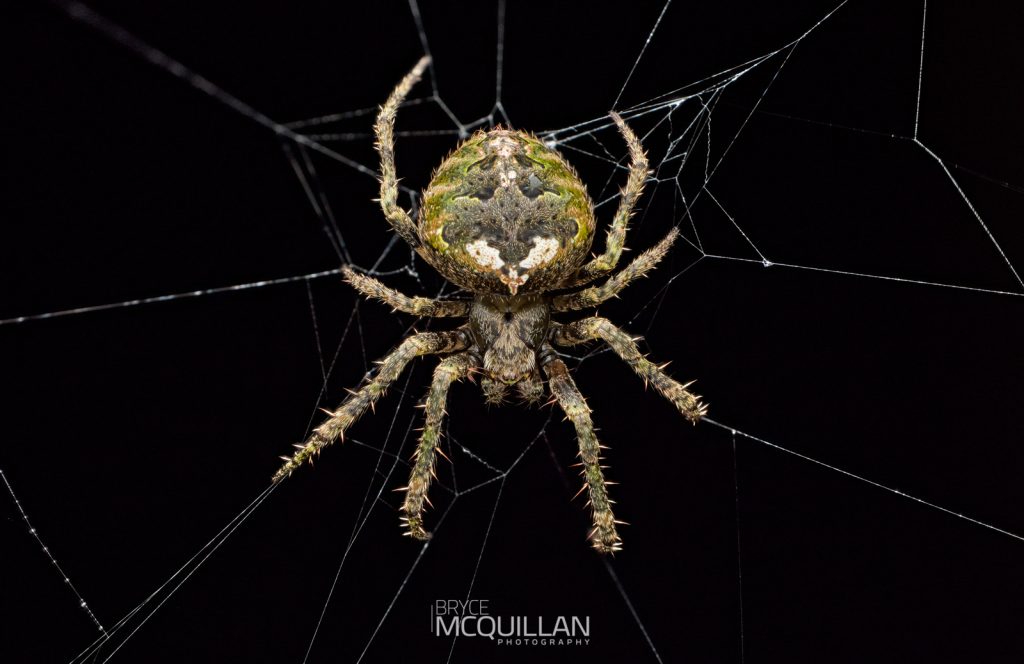
The image below clearly illustrates a focus stack where misfocus has occurred just above the eyes. While the image has been focus stacked, this does not guarantee uniform sharpness across the entire frame. Achieving a successful focus stack requires each bracketed shot to be captured with minimal and consistent movement between frames; something that is extremely challenging to do manually.
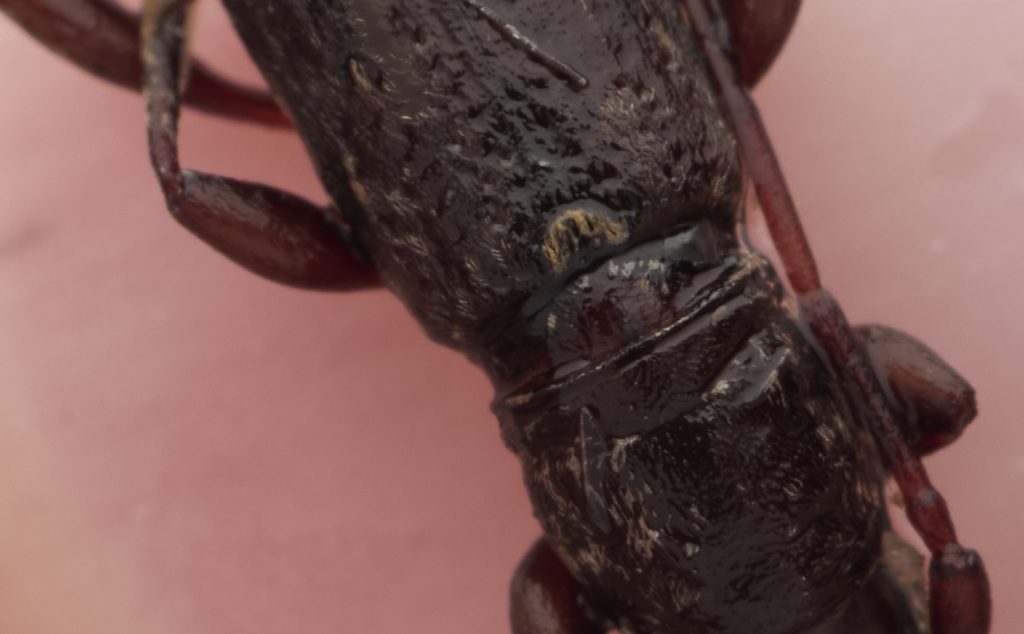
If the spacing between images is inconsistent, or if the steps between shots are too large or even too small, areas of misfocus will inevitably appear within the final stacked image, as shown below. This is particularly frustrating given the significant effort involved. The process requires carefully adjusting focus and capturing each frame, followed by the additional work of aligning and stacking the files in specialised software. The disappointment is even greater when a critical focal point, such as the eyes, has been missed, ultimately compromising the overall quality and impact of the image.
It is also important to consider that this process often involves live subjects. Unlike static studio work, there is rarely a second opportunity to repeat the process. You are fortunate if the subject remains still long enough to capture a complete stack in the first place.
An alternative approach to focus stacking has been the use of accessories such as manual focus rails. These tools can assist in achieving incremental adjustments and are often used for subjects like plants, flowers, fungi, and other relatively stationary subjects. The process involves manually turning a small adjustment knob to shift the camera position, then pausing for a few seconds to allow any motion or vibration to settle before making the next adjustment. However, achieving consistently even movements between shots can be difficult, and this method is generally not well suited to photographing live, fast-moving invertebrates or working at night when conditions are more unpredictable.
Automatic focus rails offer a more efficient and repeatable solution by automating the movement. However, they come at a considerable cost, often up to ten times that of a manual rail, and can introduce additional challenges in the field. They typically require extra equipment such as tripods and mounting accessories, special batteries, and power adapters, which can increase weight and reduce portability, making them less practical for dynamic or fast-paced field environments.
The introduction of focus bracketing with flash in the Canon R5 MKII has provided a much more convenient and streamlined alternative. Rather than relying on external focusing rails or manual adjustments, the in-camera feature combines multiple steps into one quick motion. It allows macro photographers to capture a series of bracketed images quickly and with greater consistency, significantly reducing the time, effort, and risk of missed focus that traditionally came with manual focus stacking.
While this advancement greatly improves workflow for both studio and field applications, it is important to note that it only works with autofocus lenses. It is not compatible with fully manual lenses such as the Canon MP-E 65mm or high-magnification manual lenses like the Laowa 2:1 series. Many in the macro photography community remain hopeful that Canon will develop a dedicated high-magnification autofocus lens to further extend these capabilities.
For those not using focus stacking, it has generally been agreed that f/11 offers the best balance of depth of field and sharpness. While some argue that stopping down to f/16 provides additional depth, in practice the gain is often minimal and comes at the expense of light and image sharpness, making the trade-off for me personally not worth it. In my experience, noticeable improvements in depth of field are not truly apparent until stopping down to f/25. At f/25, a significant portion of the subject can be brought into focus, but this comes with a substantial loss of light and a visible reduction in image sharpness due to diffraction.
A good friend of mine, Danilo Hegg, consistently produces stunning results photographing at f/25. His work can be seen at Southern Alps Photography and on Instagram. Danilo uses a Nikkor 105mm lens F mount, which does perform differently from how Canon EF and RF macro lenses work; it is important to keep this in mind.
However, for much of the work I undertake, particularly where fine detail is critical, the resulting softness at f/25 is not a compromise that I am generally prepared to accept.
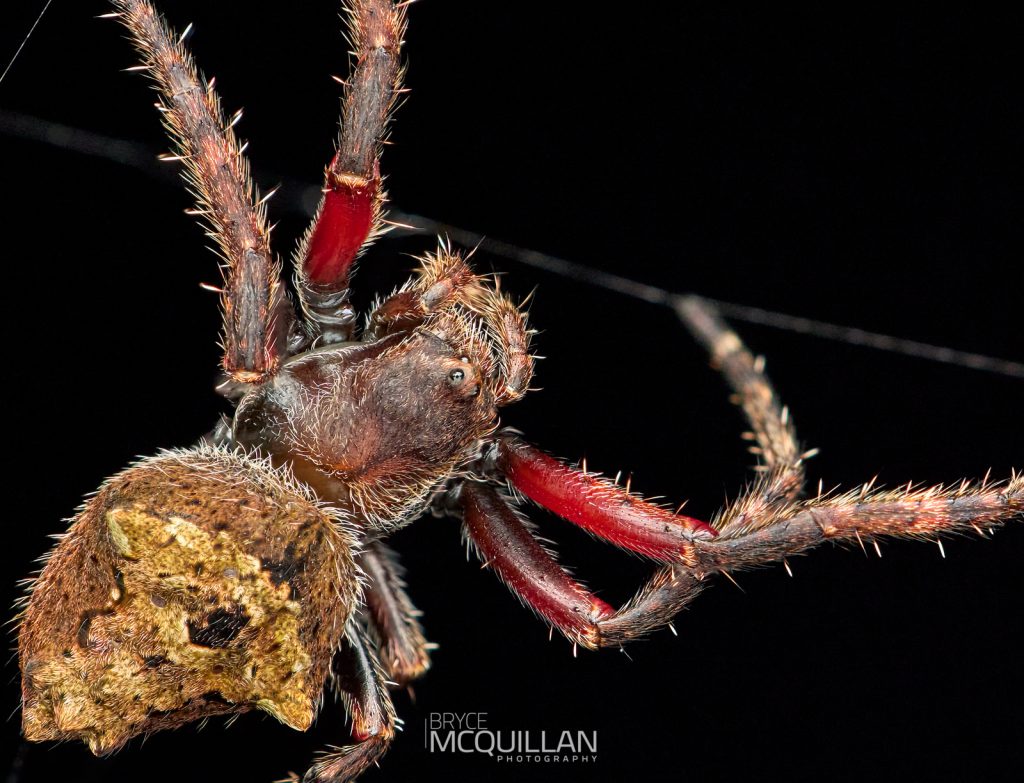
First image – F25, bottom image F11
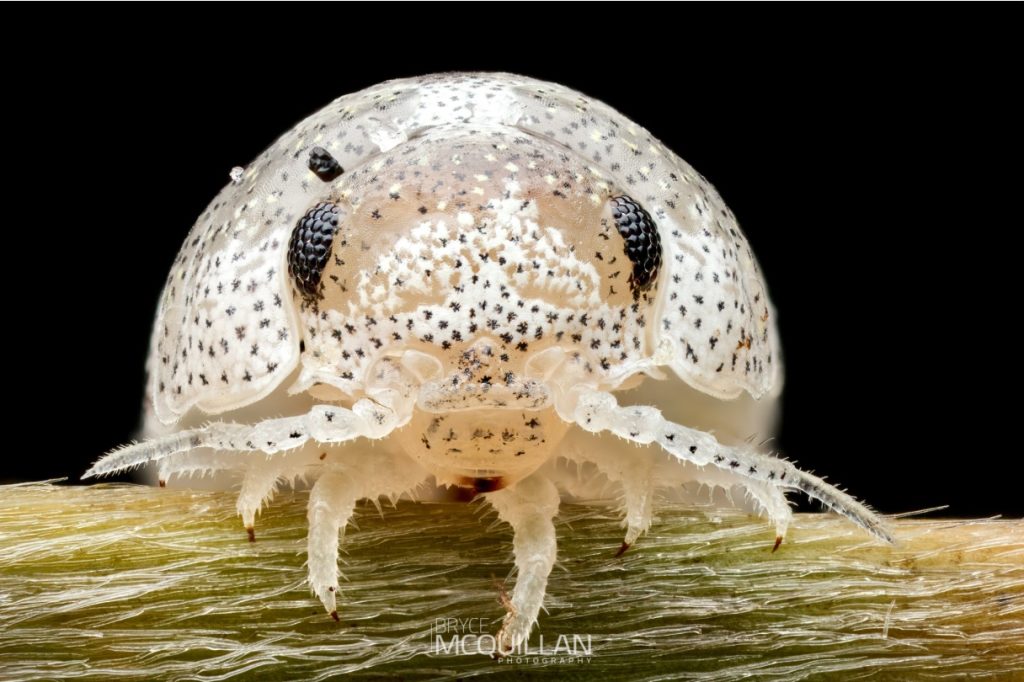
The image below shows just how valuable having the extra sharpness is. With the ability to zoom right in, we can see clearly what prey this juvenile female Socca pustulosa is feeding on. This kind of detail is incredibly important for learning more about species that are either newly described, or where little is known about their behaviour and ecology.

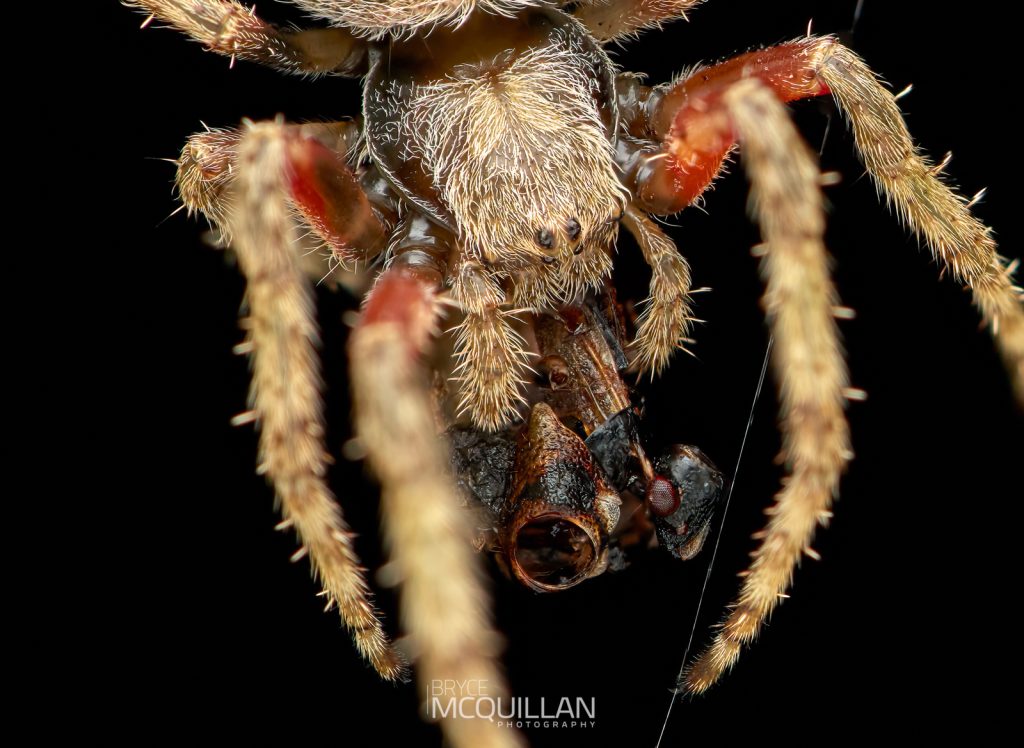

For the type of photography that I do, sharpness isn’t just about making an image look good, it’s absolutely critical. A big part of my work involves collaborating with experts here in New Zealand and overseas to help document and describe new species of invertebrates. Having razor sharp images is essential, especially when zooming in to examine the fine details that separate one species from another. This often happens in the field, where a sharp image can confirm if a specimen is mature or has the key features that we are looking for.
Two recent examples of this were the discovery of a new species of spider at Rotorua Canopy Tours, which was featured in the NZ Herald: https://www.nzherald.co.nz/rotorua-daily-post/news/new-spider-species-discovered-at-rotorua-canopy-tours-restoration-area-on-dansey-rd/OYOIKCVKBFHTLPCOVM4R5WDQRE/ and the discovery of two new species following trapping efforts in a Rotorua forest, also featured in the NZ Herald: https://www.nzherald.co.nz/rotorua-daily-post/news/two-new-species-discovered-in-rotorua-forest-following-trapping-efforts/ZNYECBXT2SLR7KDUJRUTWWNBWI/

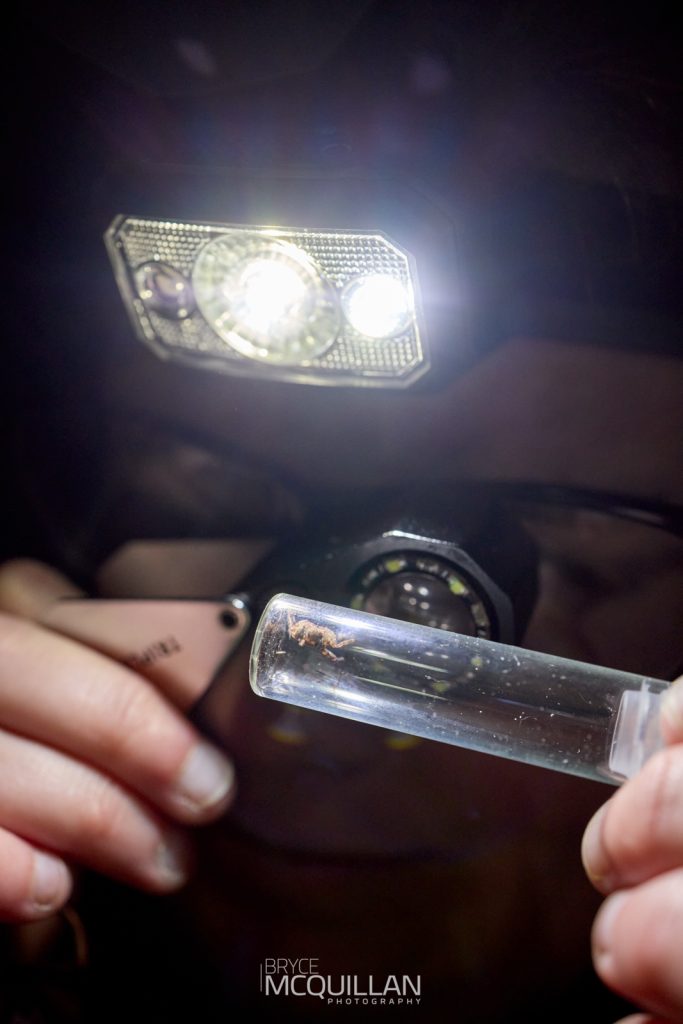
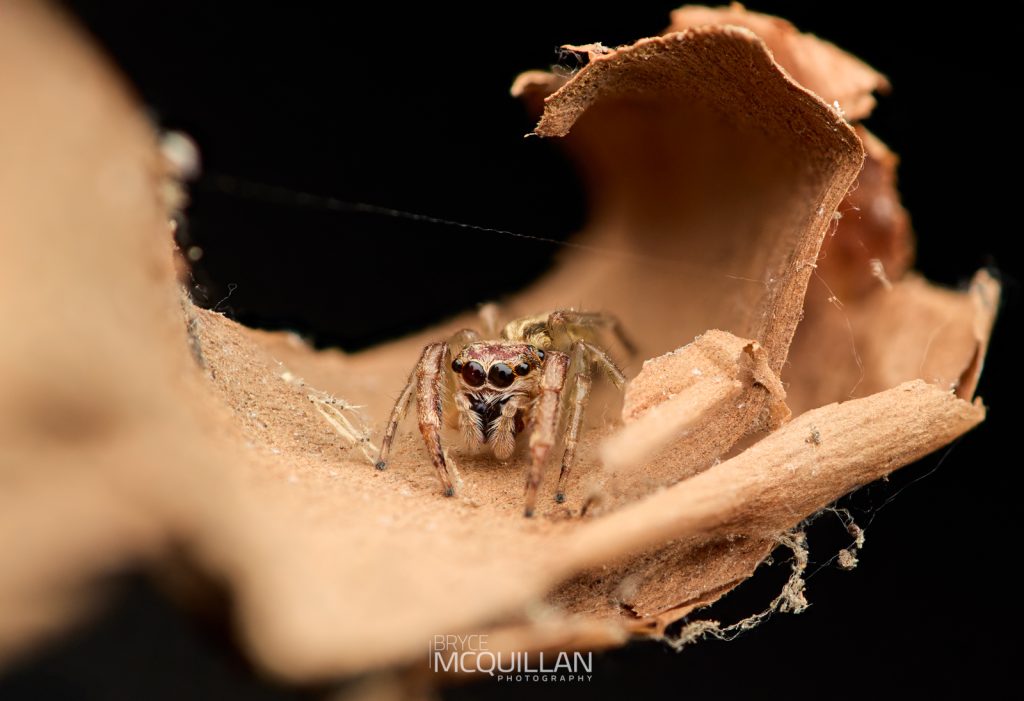
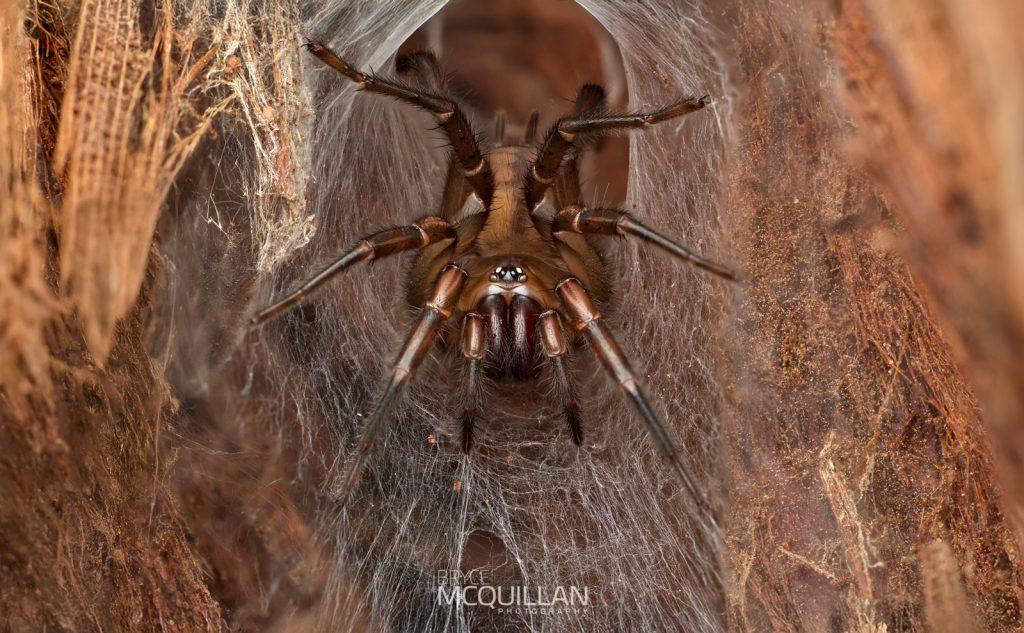
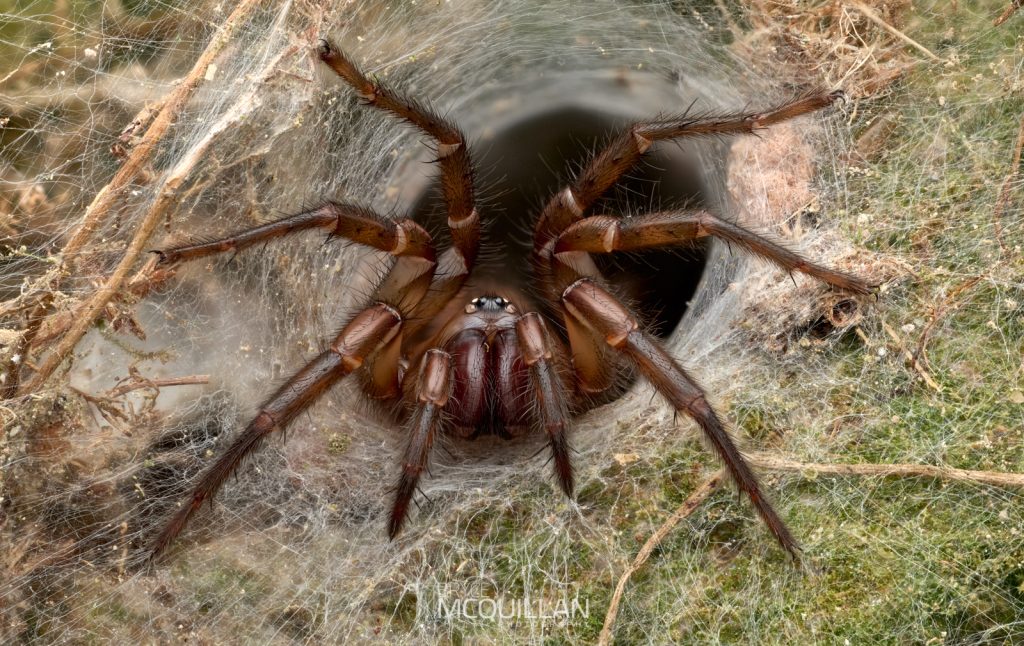
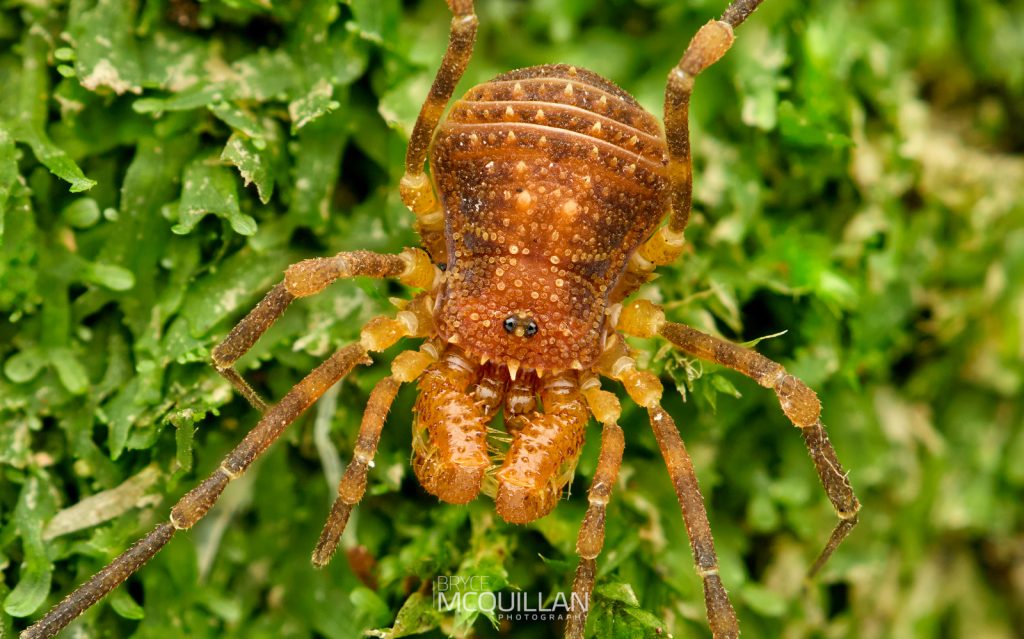
Below is a photograph of a female Banded Tunnel Web Spider (Hexathele hochstetteri). These large mygalomorphs represent some of the oldest spider lineages globally. They have extremely primitive eyesight and are highly sensitive to both light and vibration, relying predominantly on vibrations to detect prey and threats. Even the slightest bump or subtle movement will often cause the spider to retreat deep into their tunnel. As a result, approaching close enough to capture a photograph can be exceptionally challenging; typically, if you’re lucky enough to get close enough, you only get one opportunity to get an image before the spider shoots back into its tunnel.
The introduction of focus bracketing with flash in the Canon R5 MKII has transformed this process. The R5 MII allows up to 12 frames per second during focus bracketing with flash (subject to flash capability and power output). This allows me to capture multiple frames in rapid succession before the spider retreats. This capability enables the creation of small focus stacks, producing an image with a depth and clarity that would previously not have been possible. It has opened the door to producing entirely new and dynamic perspectives of a species that I have photographed numerous times before, offering a fresh take and insight on this species.
To use focus bracketing on the Canon R5 MKII with flash, it is pretty simple. Once enabled, you simply select your focus increment (step size) between 1–10 and set the number of images you want to capture (can read more here about focus bracketing. I’ve done multiple test runs at f/5.6, and from experience, I’ve found that a focus increment of 8–9 tends to give the best results when photographing subjects at larger than 1:1 magnification. I also trialed values of 6 and 7, but found the depth of field too shallow, resulting in less coverage across the subject. I have also tested f/7.1, which works much the same but requires more flash power, so flash recycling time is reduced a bit. Below is a rough guide on how much the focus moves during bracketing.
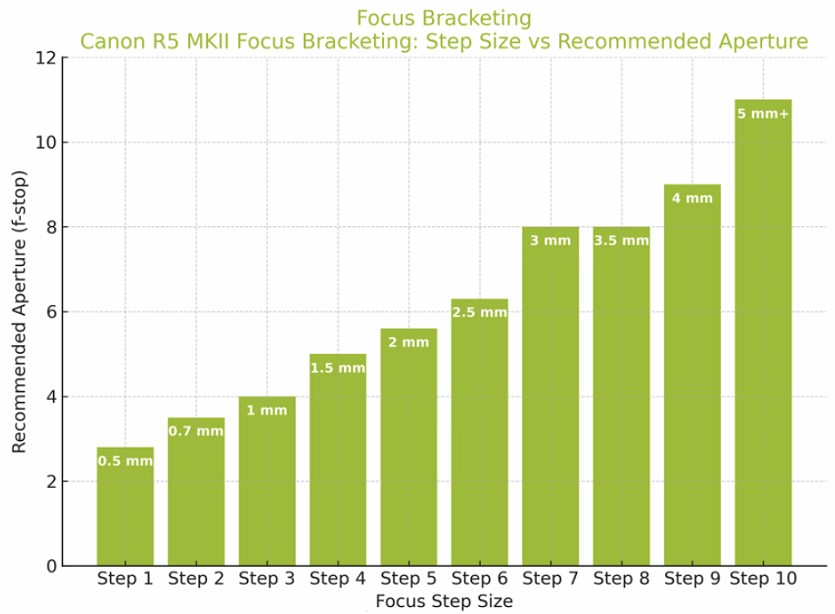
The camera moves focus slightly between shots, sometimes by less than a millimetre. Just keep in mind that focus bracketing is automatically disabled when you turn off the camera or change the shutter mode. Also focus bracketing does not work if the camera is in “silent shutter mode.” I recommend using the mechanical shutter when focus bracketing with flash. This ensures that the flash syncs correctly with the shutter.
As a general guide:
- Larger apertures like f/2.8–f/4 usually require smaller steps (eg 2-4) and a greater number of images.
- The closer you are to your subject, or the higher the magnification, the more shots you’ll need.

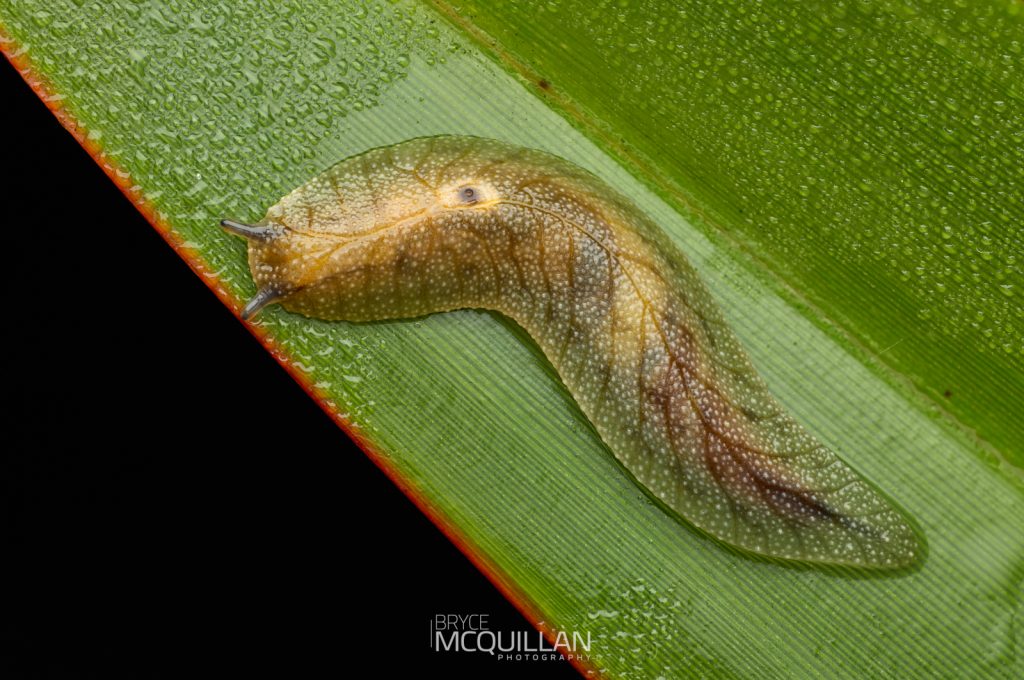
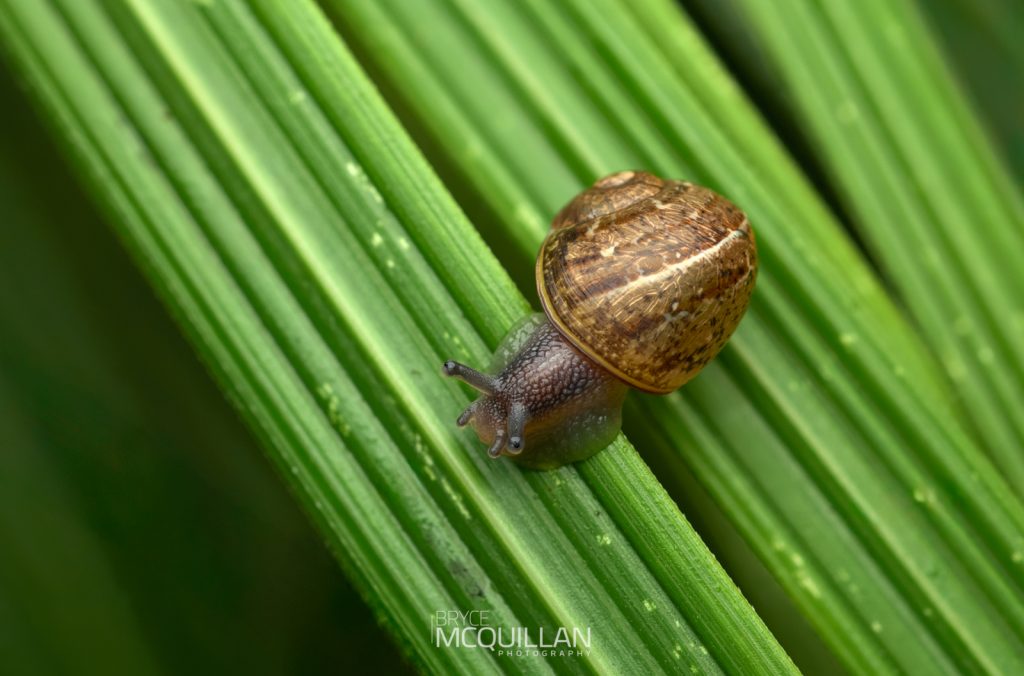
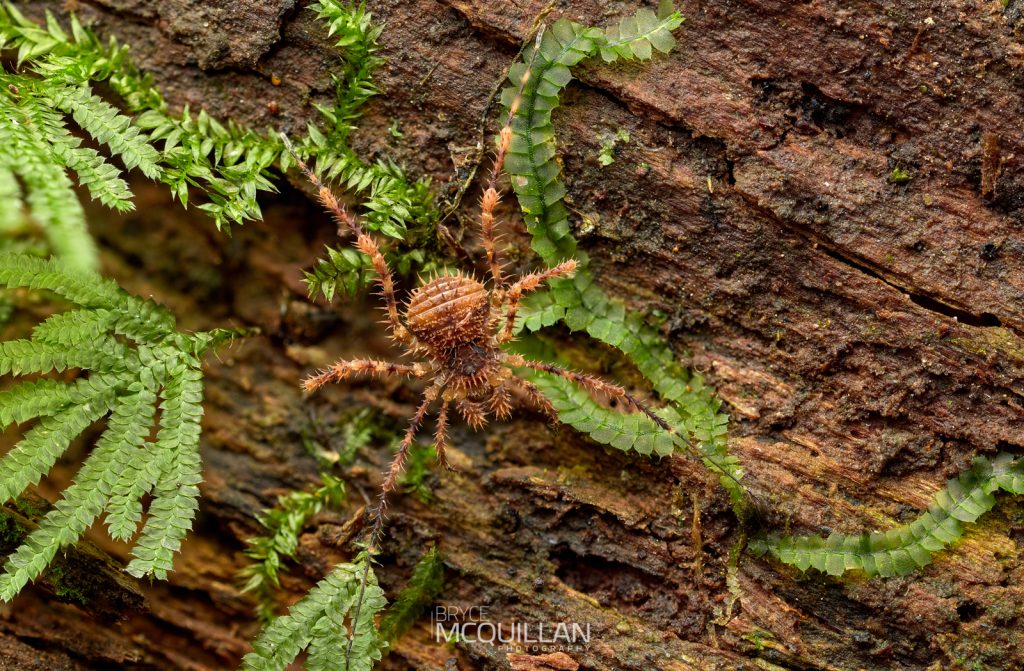
Both the leaf vein slug and snail shown below were photographed at f/5.6 using a focus increment of 6. Even with a 10-image focus stack, the depth does not extend fully through to the end of the subject. In this case, I would increase the focus step size. For the leaf vein slug, you could likely achieve full focus with just 4–5 images at f/5.6 (again, this depends on the step size, but at 8 or 9 I would expect this to be achievable). The snail would require more frames due to its larger size and greater depth. Put simply, the bigger the subject, the more depth of field is needed, and the more images you’ll require to achieve a fully stacked image.
A big feature of the Canon R5 Mark II is being able to bracket at high speed while using flash. In real terms, this has completely changed what is possible for me. Previously, I might have only managed one or two usable shots of a fast-moving or difficult subject. Now I can run a full bracket and know that at least some of the images will be razor sharp. Even without stacking, my keeper rate has dramatically improved.
I’ve also found that even when not running a bracketed stack, the Canon R5 Mark II allows me to shoot at a much higher frame rate with flash, than compared to the Canon R5. For subjects where I don’t want the focus to move, such as capturing a fast action like a spider wrapping prey, I simply turn off autofocus on the lens using the focus switch. This allows me to fire off a burst of images in quick succession, without changing focus, and later choose the best frame and angle.
Of course, there are trade-offs. Shooting at high speeds places significant demands on your flash and requires fast, high-capacity memory cards to keep up. That said, if you’re investing in a camera like the Canon R5 Mark II, you’re unlikely to be using small or slow cards. With the camera capable of up to 30 frames per second in RAW, fast cards are essential.
When using focus bracketing with the mechanical shutter (Canon R5 MKII can also focus bracket with flash, in full electionic shutter), the maximum practical speed is around 12 FPS. Even at that rate, cards fill quickly, and more critically, very few flashes can maintain consistent output at these speeds without either overheating or dropping power—particularly when shooting at smaller apertures such as f/8 to f/11, which are often required in macro work.
This is where the Canon Speedlite EL-1 stands out. It is one of the few flashes capable of reliably keeping pace with high-speed focus bracketing at up to 12 FPS. With its built-in active cooling, the EL-1 manages heat very effectively during extended shooting sequences, and its fast recycle times means your a lot less likely to have miss fire from the flash when focus bracketing. I have completed stacks of up to 40 images without encountering a single black frame.
The EL-1’s wide-angle beam feature is also particularly useful for macro photography, delivering even, wraparound illumination that enhances results at high magnifications. In addition, the built-in focus assist light greatly improves autofocus performance in low-light situations or when working with subjects that lack strong contrast — a common challenge in close-up and invertebrate photography.
Naturally, shooting at these settings is also demanding on both your camera and flash batteries. For any extended macro session, I strongly recommend carrying spare batteries to ensure continuous operation.
Finding the optimal balance between number of shots, aperture, shutter speed, flash power, and ISO requires a degree of trial and error. Settings will often need to be adapted to suit the subject and scene. For example, photographing an invertebrate such as a harvestman against a mossy tree trunk works well with E-TTL metering, which balances exposure effectively. Conversely, when photographing a subject such as an orbweb spider against a black background, E-TTL often leads to overexposure—in these situations, manual flash control delivers more consistent and predictable results.
There is no one-size-fits-all approach, and adaptability remains key. Personally, I have found that shooting around f/5.6 offers an excellent compromise between depth of field, image sharpness, and consistent flash output. I typically use a step size of approximately 8, which translates to roughly a 3.5mm shift of the focus plane between frames.
I personally think the results really do speak for themselves. I’m now able to stack images with extended depth of field, creating an image that simply is not possible using other methods or in a single image. Allowing me to achieve focus and depth on parts of the subject or image that I am wanting to draw attention to. This will allow me to help tell and capture a story that I previously would not have been able to tell.
There is no longer a need to compromise between achieving critical sharpness, or sacrificing light and contrast due to increased depth of field. As we close down the aperture to gain more depth, less light is able to pass through the lens, which in some situations makes it extremely difficult to maintain a stable, sharp image, especially handheld or when working at higher magnifications.
Pre-Capture Mode
This is a feature that I haven’t explored much just yet. But it’s clear to me that this is where the real value lies, particularly for macro photographers dealing with fast-moving or highly unpredictable subjects. Timing is everything.
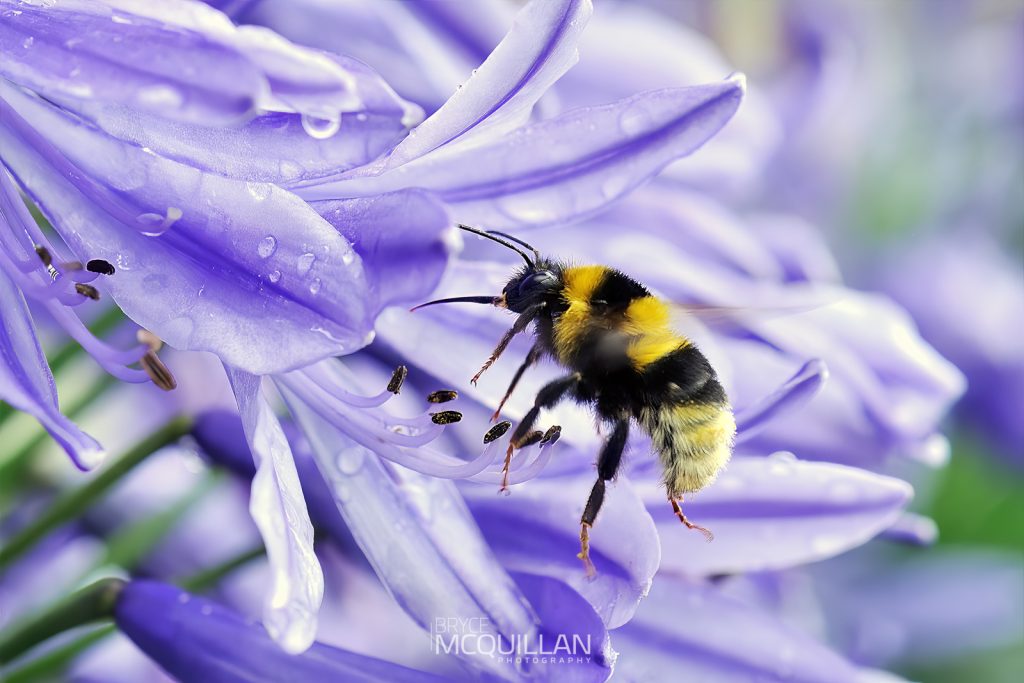
For example, photographing our small native Leioproctus spp. bee as it emerges from its burrow can be particularly challenging. These bees are relatively predictable, in that they frequently return to and leave their small burrows with pollen. The challenge lies in timing your photograph with their exact entrance or exit. There’s simply no precise way to predict the moment they will appear.
With pre-capture mode enabled, you’re effectively buffering the moment, giving yourself a significantly better chance of securing the image. I’ve tried to photograph these bees in the past, often sitting and waiting for long periods, only to end up with hundreds of frames showing nothing more than the entrance to the burrow, and not a single bee.
The same applies when trying to capture a bee exiting a flower with its hind legs loaded with pollen; or a bumblebee just as it enters a bunch of flowers, with its tongue extended, as if tasting the flower. These are fleeting, near-impossible moments to catch reliably without some form of pre-buffering. Pre-capture finally gives us a tool to respond to those split-second behaviours, hopefully enabling us to capture and better understand rare or rarely observed moments. In doing so, it allows us to more effectively educate others and contribute to the protection of these remarkable species that play a vital role in our ecosystems.
Pre-capture mode does not support flash.